Wall Hangings whether in the stairwell or another wall in a room, complement the interior decoration of where they are placed. There are many tasks involved in wall decoration. The essence of wall decoration is to enhance the look of your house and therefore you want a perfect look.
Firstly, you have to make a decision concerning what images you will hang on your wall, the sizing of the hangings and also make the most important decision of which points on your walls you will want to place your hangings.

What Is Important When Wall Hanging
Although wall hanging seems to be a simple task, it can present a lot of frustration even if you have done it before. The main task involves being accurate by placing the pictures in a straight and leveled line (not slanting level).
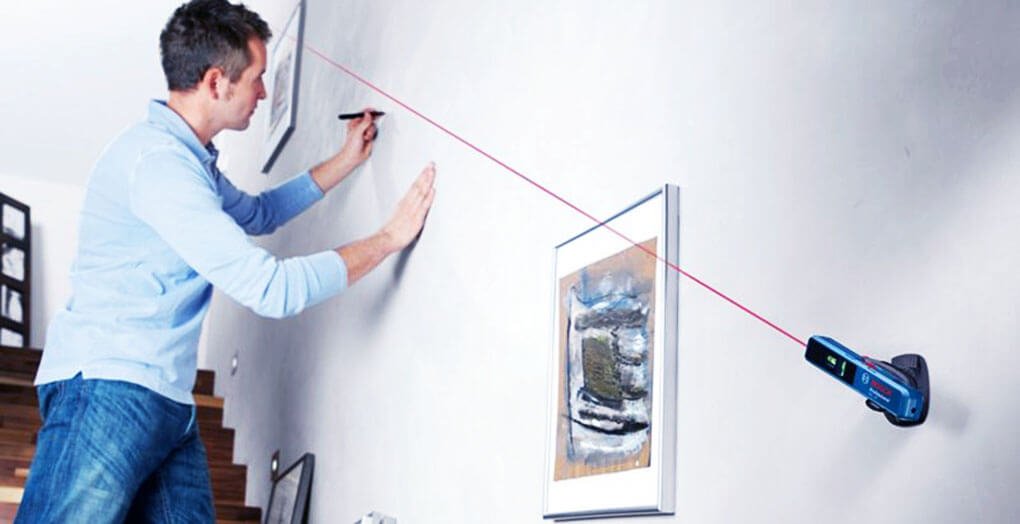
The good thing is that we have many gadgets some of which can double up to perform other tasks. In this case, when wall hanging, you need a Laser Level. Ideally, laser levels are used for construction and survey work.
They work by projecting a beam. They are usually placed on a tripod, to project a beam horizontally or vertically.
Determining the Height of a Picture
If you have kids, then you want your wall hanging to be as high as possible because kids will take it off. You also do not want the pictures to be high. You want them to be within a height you can reach because you will be wiping the dust off the pictures occasionally when doing regular cleaning of your house.
How to Hang the Picture
There are many determinants on how you will finally hang the picture. It depends on the wall material, the size of the picture you will be hanging and hanging options that are designed with the picture.
But whatever hanging option you will use, you still need a straight line to ensure that your picture is presentable. A laser level will help you place all your wall hangings in a straight line.
How to Use Laser Level
For precision leveling, you can use laser levels for mounting pictures on a wall. A laser level can help you in hanging rows of many pictures on the wall easily and you can use it for doing a gallery.
Laser levels are ideal tools for picture hanging because they are designed to be hands-free, making it hassle-free to use them.Laser levels give an accurate line measurement. You then use the line provided by the laser level to align your pictures by accurately marking the spots-where the picture will be hang.
Features of Laser Levels
The features in a laser level make it a perfect tool for this job. Laser levels are easy to operate, some of them are button operated.Most laser levels have a ruler, a class II laser, sliding stops, and a stud finder.
Worth noting is that there are different brands of laser walls and they boast different features. Some have interesting shapes like I came across one with a mouse shape.Other tools you will need to do your job effectively include a hammer, drill, nails, pencil, tripod, and a tape measure.
If you will be using nails to hang the pictures, then make sure that you buy strong enough nails that hold the weight of the picture.
Safety Measures When Using Laser Levels
Laser levels have a liquid in the bubble vials which is poisonous. In this regard, keep the device away from your children and pets. Secondly never let the beam get into your eyes by either pointing it or looking into the laser beam. The laser beam causes blindness which is irreversible.
Wall Hanging Using a Laser level
Therefore, after buying the laser level and all the items you need for the wall hanging task, here is how to use the laser level. First, decide the point where you want to hang the wall hanging.
Use a tape measure to do this, it will help in determining the height of the wall hanging. Then mark the point with a pencil. Just mark one point, the laser level will help you in marking the second point for placing your picture with its laser beam.
Read more: 7 Best Bathroom Exhaust Fan with Light and What is the difference between 4D and 5D LED light bars
Mount the Laser Level
Next, mount the laser level. Some are wall mountable and some are mounted on a tripod. If you don’t have a tripod, you can use a table or any other piece of furniture to mount it.
Then turn on the laser lever. Some laser levels are self-leveling, if it is a manual laser level, then adjust it accordingly until you have achieved the level of accuracy required.
Mark the Second Spot with the Laser Level
Now switch it on and now shoot the laser beam on your wall, to align with the pencil spot that you had marked on the wall. The first pencil point is where you will place the first nail. If you are not using nails to hang your pictures, you will use the marked point to align with one corner of your wall hanging.
You are using the laser level to help you to know where to accurately place the second point on the wall.The laser beam will provide you with a straight line that aligns with the marked pencil spot on the wall. Now take the wall hanging and place it against the laser beam line.
Also read: How to Make a Big House Feel Cozy – Some Simple Ideas for You
Moving On
Place the hanging on the wall as if you are hanging it, with one corner placed at the spot where you have marked with a pencil. Using a pencil, mark the other corner of the wall hanging where you will place the second nail.
Alternatively, you can use a tape measure. Get the dimensions of the picture and use them to mark the second spot using the laser beam on the wall. Mark a second spot where the picture will be placed using the picture dimensions.
You now have two marked spots on the wall where the two bottom corners of your wall hanging will be placed. You can repeat the process for all the wall hangings you have.
Hang Your Pictures
Now drill nails at the two spots marked on the wall. You can use a hammer or power drill to do this. Ensure that the nail is securely fixed on the wall before placing the picture on the two nails.
If the nails are not well fixed, the picture will fall. You do not want to risk breaking your beautiful picture. You can now hang your picture. And if you are not using nails, hang the pictures accordingly.
Empty walls are dull and the only way to add life to them is by placing wall pictures.

Here, I provide valuable insights into the lighting industry, drawing from 12 years of experience. My aim is to share useful and practical tips, life hacks, and comprehensive product reviews. I hope that collective expertise, advice, and recommendations prove beneficial to you.


